Here’s a quick tip to help you create more interesting Pads in Ableton. By using the Shaper device it’s possible to turn even a simple VST Pad sound into an evolving layer in your production.

The Shaper Plugin
For this tutorial you’ll need the shaper plugin that was introduced in Ableton 10. The Shaper is a Max 4 Live device in Ableton. These types of devices are listed as . amxd devices in the Ableton browser. The shaper has an Lfo that can be mapped with any shape to any midi CC parameter that is available on your VST or synthesiser.

How to make more interesting Pads in Ableton with Shaper
Pad Sound
First we need a Pad sound to experiment with. For this example I started with a Pad sound on the Arturia Prophet V. I found the Root and 5th of the key and drew in long MIDI notes playing those tones.

I chose a brass sound for my Pad called – ‘Classic Brass’.
Select 3 Parameters to Modulate
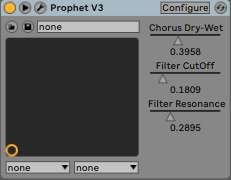
To make our pad sound evolve we next need to select some parameters to modulate. Here I chose three obvious parameters of the sound which should have a pronounced affect on the timbre. These were:
- Filter Cutoff
- Filter Resonance
- Chorus Dry-Wet (fx)
To select parameters for automating on any VST in Ableton you need to hit the configure button on the top right (highlighted green) of the VST mini window. Then any element of the synth that is CC available will appear in the parameters box once you click on it on the main synth window.

Once done successfully this should look like this:
Add the Shaper Plugin after the Pad
Next you want to add the shaper plugin to your channel, after the VST Synth that is playing the Pad part. When Shaper first loads it should look like this.

Map Shaper to the Pad
We now want to tell Shaper to communicate with the Pad Sound. To do this we need to map Shaper to the 3 parameters we selected in the earlier step. Click on the tiny notepad icon in the top right hand area of the main curve window and this will open up a mapping matrix. This allows you to then map shaper to the elements we chose earlier, as well as specify the amounts by which each will be modulated.

Draw a crazy line
With the mapping complete we can now experiment with any sort of modulation line in the main window. I drew this line which was aiming to be quite random whilst not too extreme.

Experiment
With this done it’s now time to experiment. You can try different lines, rates and depths (right hand window) and play with the phase and offset to achieve endless possibilities. Because pads and drones often play lower in the mix, don’t be afraid to experiment and go crazy with the different modulation parameters and amounts.
First up is an example of a MIDI chord part I created using the piano roll and drawing the MIDI notes in. All MIDI notes are the same velocity and the part is as uniform sounding as it could be (fig 1).
Conclusion
This technique should help you achieve more interesting pads in Ableton and can be transferred to a bunch of other applications using shaper to randomise different parameters.
In summary:
- Shaper is an incredible tool to create semi-random effects especially on pads
- Select 3 parameters to modulate on your Pad synth
- Map those parameters to the shaper Max4Live device
- Experiment with the amount of mapping
- Experiment with the rate and depth of mapping
Here’s a quick video breakdown of the above technique:
Have fun trying this and let me know how you get on or any questions you have in the comments below. For more ideas on working with Pads and how to EQ them check out this post.
Leave a Reply