Vocals can make or break your track
One of the hardest things to achieve as a producer and mixer is pro sounding vocals. A brilliantly produced vocal can make all the difference. It can change an average sounding beat into a gripping piece of art, a dud demo into a proper party banger.

Although vocal production and mixing is an entire topic, here we’ll look at one of the first steps towards a more pro vocal sound. Using automation at the start of a vocal mix can help things downstream immensely. Although the singer and performance is the ultimate factor, there is a lot we can do early in a mix to make any vocal sound better .
Getting Pro Sounding Vocals
Step 1 – Identify the challenge
One of the main challenges we have when mixing and producing vocals is their huge dynamic range. Recorded vocals are often one of the most dynamic elements in our mixes.

A kick drum may have a huge attack but if it’s a sample, each kick will still carry the same energy. Other elements such as VST pads and synths can remain fairly constant in energy too (unless programmed to intentionally vary). Other programmed drum parts will also stay fairly constant. Even though guitars and live instruments can vary in level too, raw vocals are often one of the most variable we work with.
In the example below (fig 1) you can see the vocal part I was mixing. Even looking at the waveform, you can see how much the level varies between each word and syllable.

Step 2 – The Problem with fixing vocals with more Compression
Often we try to solve the level variation problem above by adding layer after layer of compression. A modern vocal may go through at least three stages of compression (channel, parallel and Bus for example) before it even hits the Master channel. Fig 2 below shows some of the compressors I used on the vocal above.

While this multiple stages of compression approach is often the key to modern vocal sounds, compressors alone can’t solve everything. Even the best compressors will still perform better if we do some of the leg work first on the way in.
Step 3 – Hard work with your ears
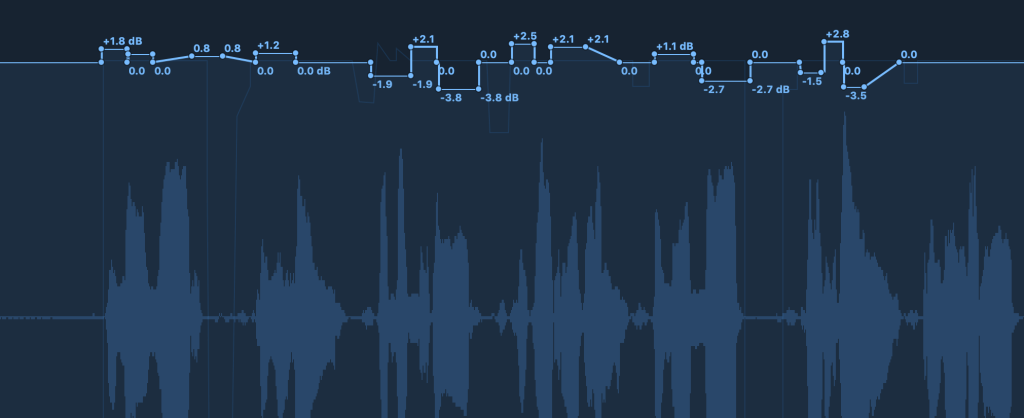
With a bit of hard work and careful listening we can do some great work with simple automation before our vocals reach any compression.
The most accurate way to do this is to add a gain plugin to your Vocal channel before any effects and then start levelling the vocal word by word. The more time we put in at this stage the better the end result.
What I like to do in Logic is use the loop brace and focus on each bar one at a time. I loop that bar over and over and really listen to the vocals with a microscope. You can see what the end result might look like in fig 3 below.

I listen to each syllable and try and make sure the lyrics and message of the vocal are clear. With the vocal roughly levelled out like this before any compression, the Compressor can then function far more effectively.
Step 4 – Alternatives
The above approach is painstaking but I think the results make it well worthwhile. However, if you are short on time it is also worth mentioning alternatives. The most obvious of these is Waves Vocal Rider. You could use this before the Compression in the same way (fig 4 below). It aims to achieve a similar result.

Conclusion
As we’ve seen, Vocals are often one of the most dynamic elements we need to work with in mixing. Getting pro sounding vocals is crucial to a good production. Often we try to fix things with too many plugins and too much compression. If we put some time in first to use manual automation, the compressors can do their job more subtly and efficiently. If you’d like to check out more automation techniques try this post. Let me know how you get on with your vocal production in the comments below.
Leave a Reply